Train Natural Language Dialogue Task
In this section, we will introduce how to import Hugging Face models and datasets into OpenRL, as well as how to use a custom reward model and customize the output of wandb through a natural language dialogue task ( DailyDialog ).
Introduction to DailyDialog
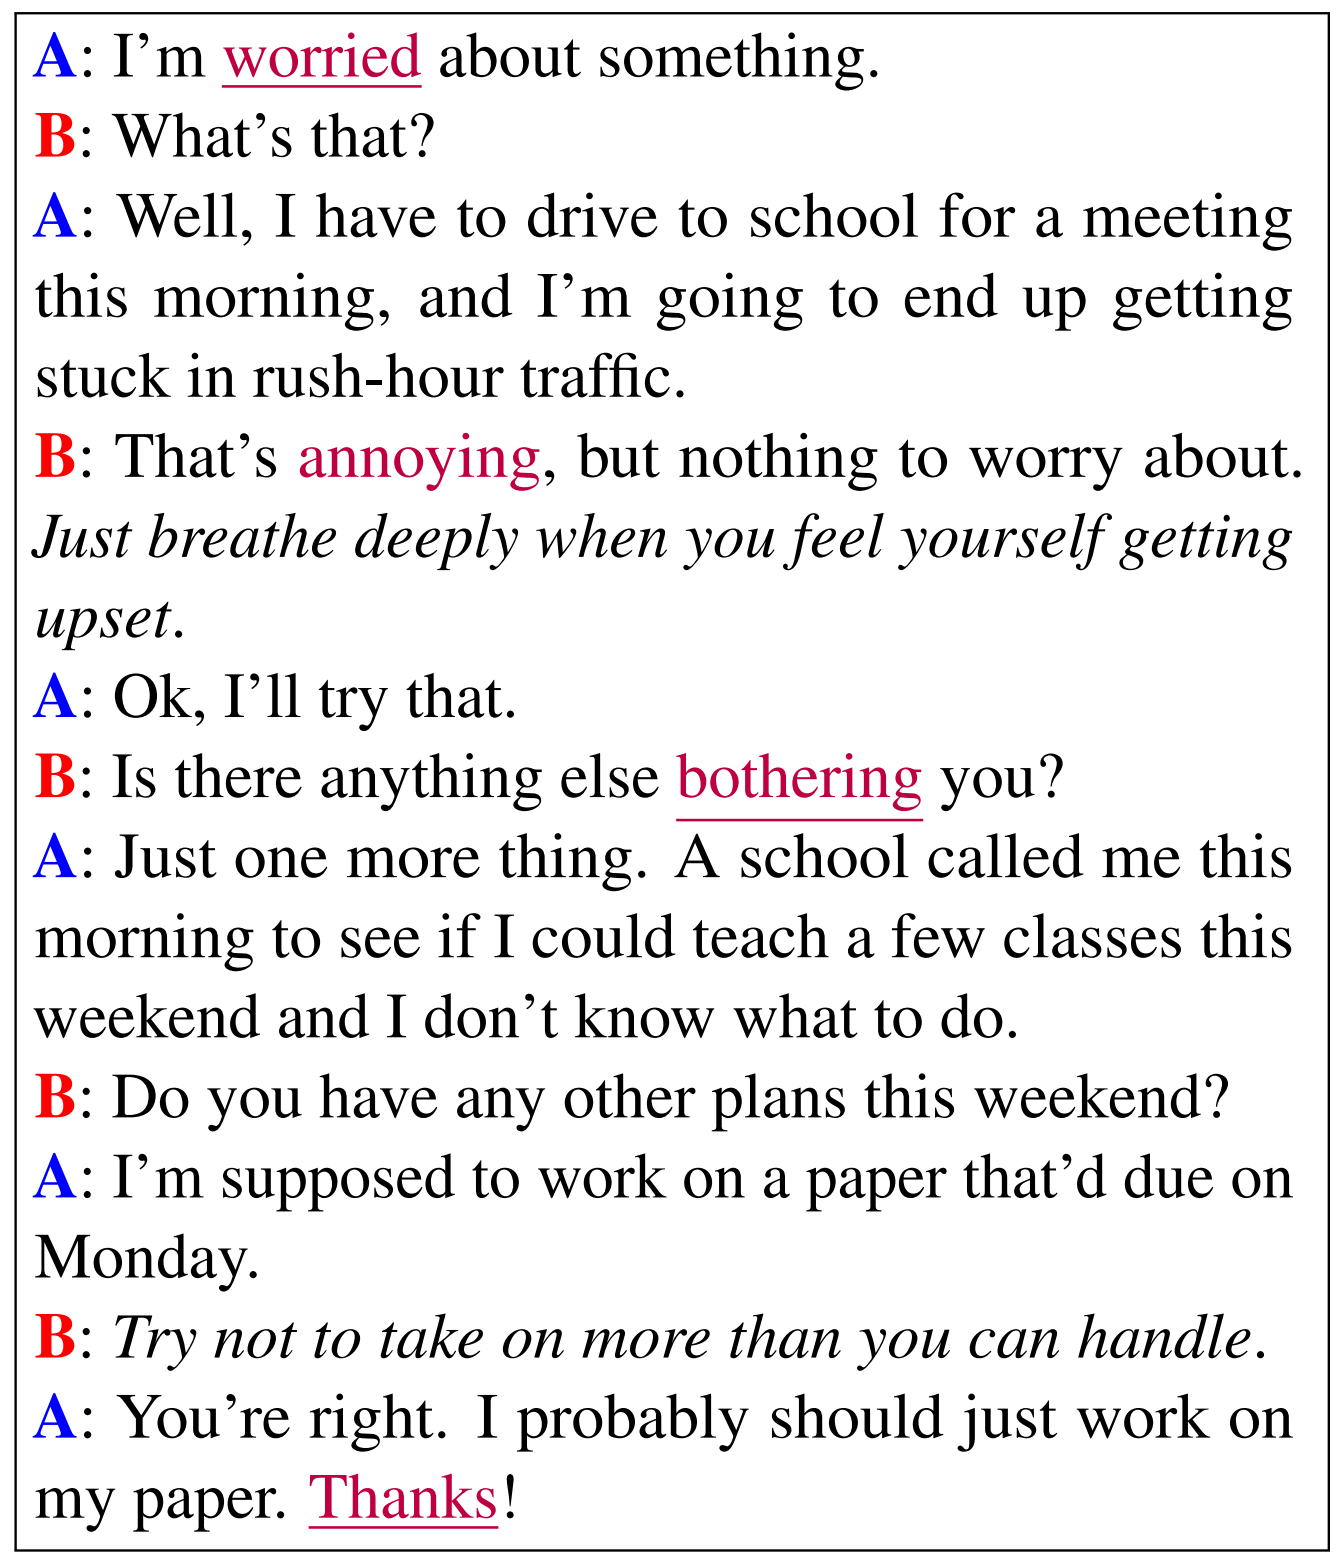
DailyDialog is a multi-turn dialogue dataset, which contains a total of 13,000 dialogues.
The following image shows an example dialogue from DailyDialog:
In the past, supervised learning was commonly used for training natural language tasks, but recent research has shown that reinforcement learning can also be used to train language models, and can significantly improve model performance (see [1][2][3]).
Next, we will provide a detailed introduction on how to use OpenRL to train natural language tasks.
Creat Environment and Load Dataset
Training for natural language tasks involves the use of some additional packages. Users can install these packages using the following command:
pip install "openrl[nlp]"
Similar to the tutorial on multi-agent RL (MPE ),
we first need to write a train_ppo.py file and include the following training code:
# train_ppo.py
from openrl.envs.common import make
from openrl.modules.common import PPONet as Net
from openrl.runners.common import PPOAgent as Agent
from openrl.configs.config import create_config_parser
def train():
    # Add code to read the configuration file.
    cfg_parser = create_config_parser()
    cfg = cfg_parser.parse_args()
    # Create NLP environment.
    env = make("daily_dialog",env_num=2,asynchronous=True,cfg=cfg)
    # Create neural network.
    net = Net(env, cfg=cfg, device="cuda")
    # Create training agent.
    agent = Agent(net)
    # Begin training.
    agent.train(total_time_steps=100000)
    # Save the trained agent.
    agent.save("./ppo_agent/")
if __name__ == "__main__":
    train()
Then, we can create a configuration file named nlp_ppo.yaml and add the following content:
# nlp_ppo.yaml
env: # environment parameters
    args: {
        "tokenizer_path": gpt2, # path to load tokenizer
        "data_path": daily_dialog # dataset name or path
    }
seed: 0 # set seed
lr: 1e-6 # set learning rate of policy model
critic_lr: 1e-6 # set learning rate of critic model
episode_length: 20 # set the length of each episode
use_recurrent_policy: true
From the above configuration file,
Training an NLP task requires additional settings for the environment parameter env.args.
The tokenizer_path in the environment parameters is used to specify the Hugging Face name or local path for loading text encoders.
In addition, data_path in the environment parameters can be set to either a Hugging Face dataset name or a local dataset path.
Train with Hugging Face’s models.
In OpenRL, we can use models from Hugging Face for training.
To load a model from Hugging Face, we first need to add the following content in the configuration file nlp_ppo.yaml :
# nlp_ppo.yaml
model_path: rajkumarrrk/gpt2-fine-tuned-on-daily-dialog # pre-trained model name or path
use_share_model: true
ppo_epoch: 5 # ppo iteration times

env: # environment parameters
    args: {
        "tokenizer_path": gpt2, # path to load tokenizer
        "data_path": daily_dialog # dataset name or path
    }
lr: 1e-6 # set learning rate of policy model
critic_lr: 1e-6 # set learning rate of critic model
episode_length: 128 # set the length of each episode
num_mini_batch: 20
Then you need to add the following code in train_ppo.py :
# train_ppo.py
from openrl.envs.common import make
from openrl.modules.common import PPONet as Net
from openrl.runners.common import PPOAgent as Agent
from openrl.configs.config import create_config_parser
from openrl.modules.networks.policy_value_network_gpt import (
    PolicyValueNetworkGPT as PolicyValueNetwork,
)
def train():
    # Add code to read the configuration file.
    cfg_parser = create_config_parser()
    cfg = cfg_parser.parse_args()
    # Create NLP environment.
    env = make("daily_dialog",env_num=2,asynchronous=True,cfg=cfg)
    # Create neural network.
    model_dict = {"model": PolicyValueNetwork}
    net = Net(env, cfg=cfg, model_dict=model_dict)
    # Create training agent.
    agent = Agent(net)
    # Begin training.
    agent.train(total_time_steps=100000)
    # Save the trained agent.
    agent.save("./ppo_agent/")
if __name__ == "__main__":
    train()
By making the simple modifications outlined above, users can train using pre-trained models on Hugging Face.
Note
In the above example, we used the model PolicyValueNetworkGPT .
OpenRL also supports user-defined models (such as a custom model named CustomPolicyValueNetwork ),
which can be passed into the training network in the following way:
model_dict = {"model": CustomPolicyValueNetwork}
net = Net(env, model_dict=model_dict)
If you want to separately implement the policy network and value network, you can achieve it through the following methods:
model_dict = {
    "policy": CustomPolicyNetwork,
    "critic": CustomValueNetwork,
}
net = Net(env, model_dict=model_dict)
The implementation method of custom models can refer to PolicyValueNetworkGPT、PolicyNetwork and ValueNetwork 。
Use Reward Model
Usually, the datasets for natural language tasks do not include reward information. Therefore, if reinforcement learning is used to train a natural language task, an additional reward model needs to be used to generate rewards.
In this DailyDialog task, we will use a composite reward model that includes the following three parts:
Intent Reward:When the generated text by the agent is close to the expected intent, the agent can receive higher rewards.
METEOR Metric Reward: METEOR is a metric used to evaluate text generation quality and can be used to measure how similar generated texts are compared with expected ones. We use this metric as feedback for rewards given to agents in order to optimize their text generation performance.
KL Divergence Reward:This reward is used to limit how much text generated by agents deviates from pre-trained models and prevent issues of reward hacking.
Our final reward is a weighted sum of these three rewards where the coefficient of KL Divergence Reward changes dynamically based on its value.
To use this reward model in OpenRL, users do not need to modify training code but only need add reward_class parameter in nlp_ppo.yaml file.
# nlp_ppo.yaml
reward_class:
    id: NLPReward # reward model name
    args: {
        # The name or path of the model used for intent recognition.
        "intent_model": rajkumarrrk/roberta-daily-dialog-intent-classifier,
        # The name or path of the pre-trained model used for calculating KL divergence.
        "ref_model": rajkumarrrk/gpt2-fine-tuned-on-daily-dialog,
    }

model_path: rajkumarrrk/gpt2-fine-tuned-on-daily-dialog # pre-trained model name or path
use_share_model: true
ppo_epoch: 5 # ppo iteration times
env: # environment parameters
    args: {
        "tokenizer_path": gpt2, # path to load tokenizer
        "data_path": daily_dialog # dataset name or path
    }
lr: 1e-6 # set learning rate of policy model
critic_lr: 1e-6 # set learning rate of critic model
episode_length: 128 # set the length of each episode
num_mini_batch: 20
Note
OpenRL supports users to use custom reward models.
First, the user needs to write a custom reward model (which needs to inherit from the BaseReward class).
Then, the user needs to register the custom reward model by adding the following code in train_ppo.py :
# train_ppo.py
from openrl.rewards.nlp_reward import CustomReward
from openrl.rewards import RewardFactory
RewardFactory.register("CustomReward", CustomReward)
Finally, the user needs to fill in their custom reward model in nlp_ppo.yaml :
reward_class:
    id: "CustomReward" # custom reward model name
    args: {} # the parameters that may be used in the custom reward model
Customize wandb Output
OpenRL also supports user-defined output content for wandb or tensorboard.
For example, during the training process of this task, we also need to output information on various types of rewards
and KL divergence coefficients.
Users can add the vec_info_class parameter in the nlp_ppo.yaml file to achieve this:
# nlp_ppo.yaml
vec_info_class:
    id: "NLPVecInfo" # Call the NLPVecInfo class to print information about rewards in the NLP task.
# set wandb information
wandb_entity: openrl # This is used to specify the wandb team name. Please replace openrl with your own team name.
experiment_name: train_nlp # This is used to specify the name of the experiment.
run_dir: ./run_results/ # This is used to specify the path for saving experimental data.
log_interval: 1 # This is used to specify how often to upload wandb data every few episodes.
# Fill in other parameters yourself...
After modifying the configuration file, enable wandb in the train_ppo.py file:
# train_ppo.py
agent.train(total_time_steps=100000, use_wandb=True)
Then execute ‘python train_ppo.py –config nlp_ppo.yaml’, after a while, you can see the following output in wandb:
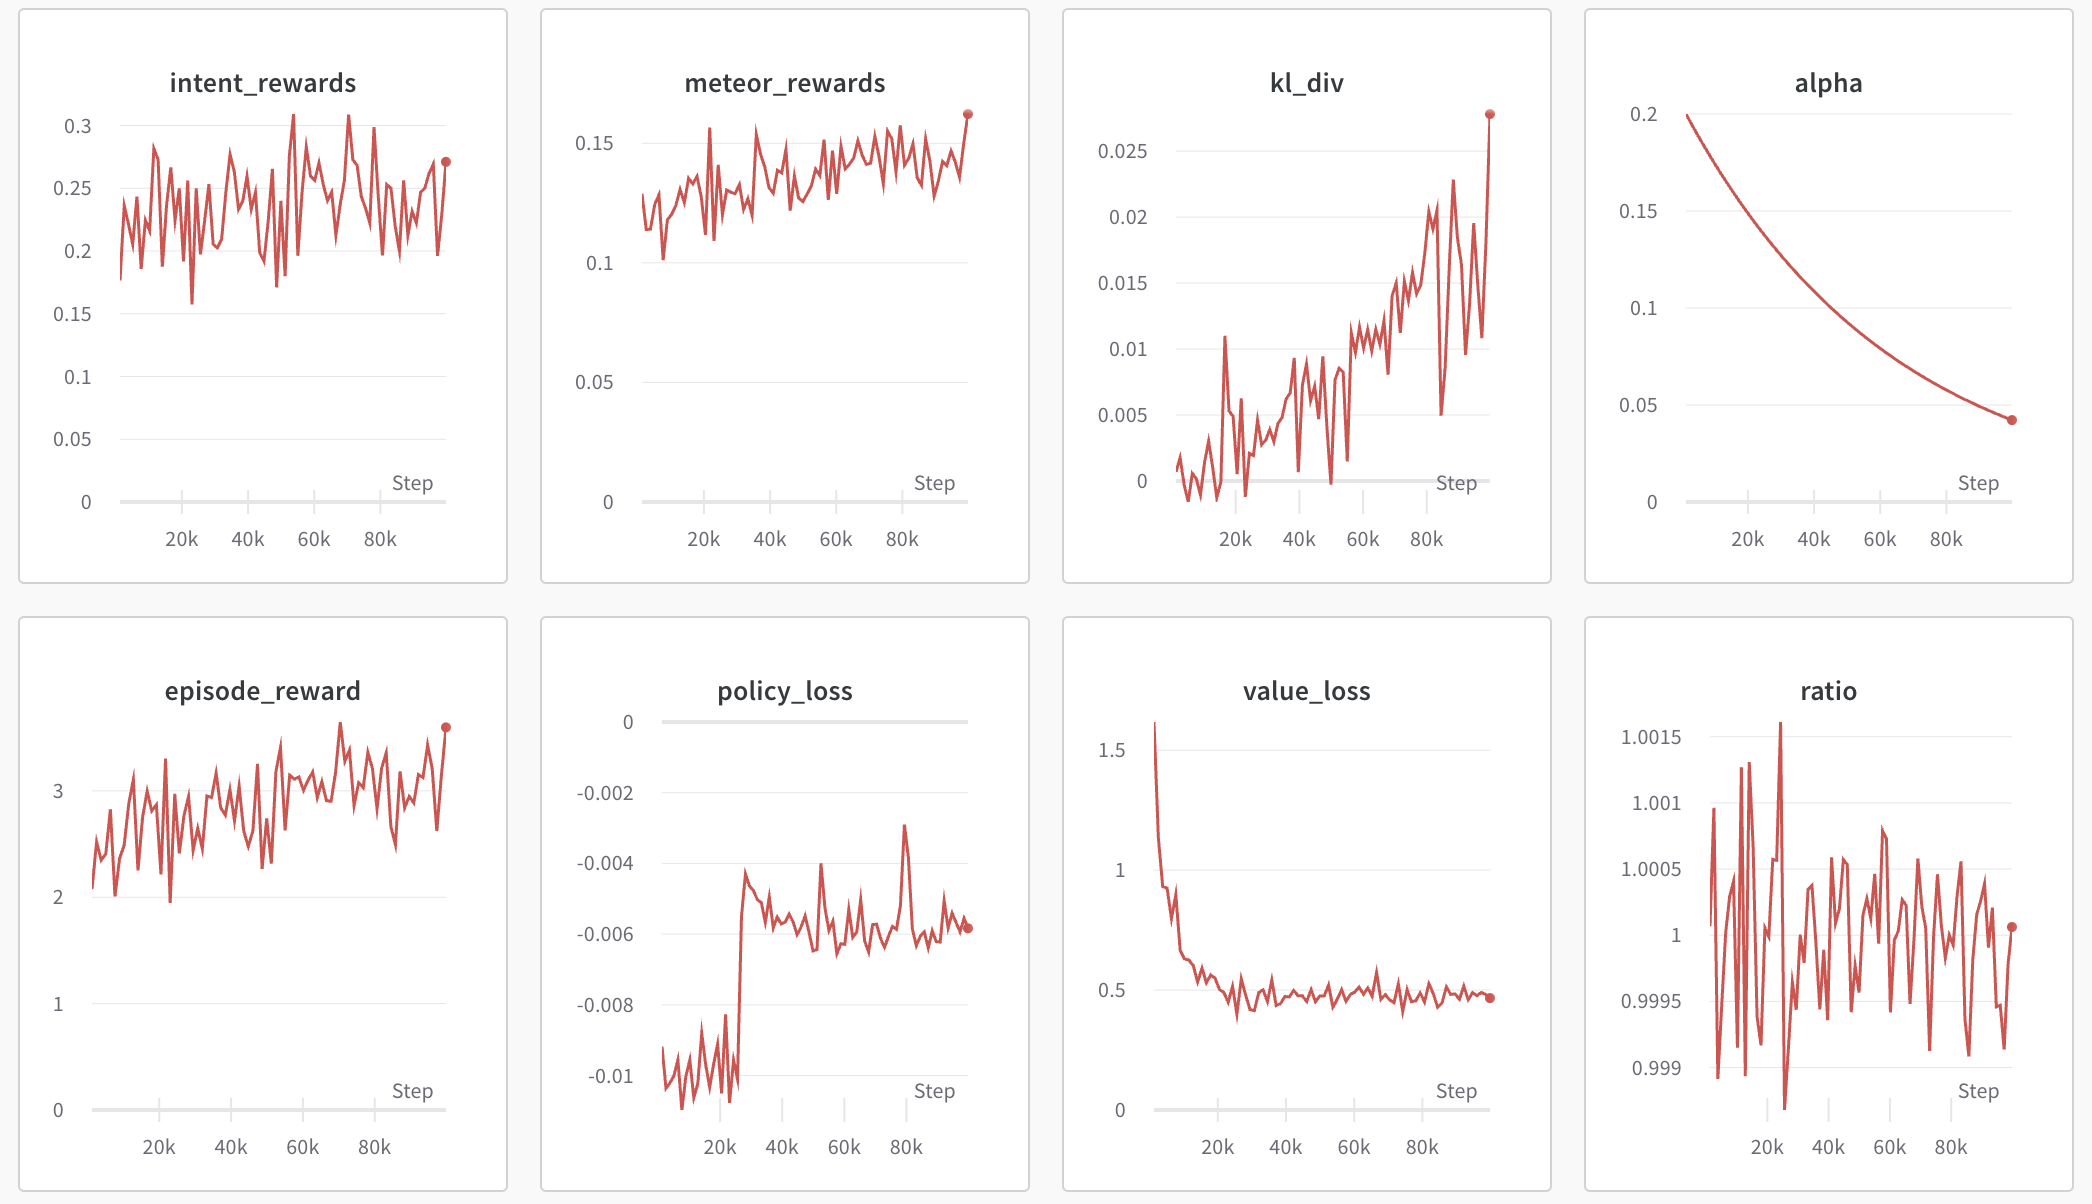
From the above figure, we can see that wandb has outputted information on various types of rewards and the KL divergence coefficient.
If the user needs to output other information, they can also refer to the NLPVecInfo class
and VecInfo class to implement their own CustomVecInfo class.
Then, it is necessary to register the custom CustomVecInfo class in train_ppo.py :
# train_ppo.py
# Register the CustomVecInfo class.
VecInfoFactory.register("CustomVecInfo", CustomVecInfo)
Finally, just fill in the CustomVecInfo class in the nlp_ppo.yaml file:
# nlp_ppo.yaml
vec_info_class:
    id: "CustomVecInfo" # Call the CustomVecInfo class to output custom information.
Accelerate training with Automatic Mixed Precision
OpenRL also provides a feature to enable automatic mixed-precision training in one step. Users only need to add the following parameters in the configuration file:
# nlp_ppo.yaml
use_amp: true # Enable automatic mixed precision training.
Tip
Users can find sample code for training nlp tasks in train_ppo.py . Find the parameters for training nlp tasks in nlp_ppo.yaml . Users can execute python train_ppo.py –config nlp_ppo.yaml to train the conversation task.
Accelerate training with DeepSpeed
OpenRL also provides a feature to enable DeepSpeed training in one step. Users first need to add two configuration files:
# ds_config.yaml
{
  "train_batch_size": 32, # train_batch_size = episode_length * env_num / num_mini_batch
  "train_micro_batch_size_per_gpu": 16, # train_micro_batch_size_per_gpu = train_batch_size / num_gpu
  "steps_per_print": 10,
  "zero_optimization": {
      "stage": 2, # default to use Zero2
      "reduce_bucket_size": 5e7,
      "allgather_bucket_size": 5e7
  },
  "fp16": {"enabled": false, "loss_scale_window": 100} # whether to use fp16
}
# eval_ds_config.yaml
{
  "train_batch_size": 32,
  "train_micro_batch_size_per_gpu": 16,
  "steps_per_print": 10,
  "zero_optimization": {
    "stage": 0, # default to use cpu offload for ref_model and reward model
    "offload_param": {"device": "cpu"}
},
  "fp16": {"enabled": false} # whether to use fp16
}
Next enable DeepSpeed in nlp_ppo_ds.yaml :
use_deepspeed: true
use_fp16: false
use_offload: false
deepspeed_config: ds_config.json
reward_class:
  id: "NLPReward"
  args: {
    "use_deepspeed": true,
    "ref_ds_config": "eval_ds_config.json", # use eval ds config for ref model
    "ref_model": "rajkumarrrk/gpt2-fine-tuned-on-daily-dialog",
    "intent_ds_config": "eval_ds_config.json", # use eval ds config for reward model
    "intent_model": "rajkumarrrk/roberta-daily-dialog-intent-classifier",
  }
Tip
episode_length and num_mini_batch can be found in nlp_ppo_ds.yaml ;
env_num can be found in train_ppo.py ;
please ensure that all parameters meet the following relationship: train_batch_size = episode_length * env_num / num_mini_batch .
Finally, please run the command to start training:
deepspeed train_ppo.py --config nlp_ppo_ds.yaml
Training results of OpenRL
The table below shows the results of training the dialogue task using OpenRL. The results indicate that after training with reinforcement learning, all model indicators have improved. In addition, from the table below, it can be seen that compared to RL4LMs , OpenRL has a faster training speed (on the same server with NVIDIA 3090 GPUs, the speed is increased by 17.2%), and better final performance:
FPS(Speed) |
Rouge-1 |
Rouge-Lsum |
Meteor |
SacreBLEU |
Intent Reward |
Mean Output Length |
|
|---|---|---|---|---|---|---|---|
Supervised Learning |
None |
0.164 |
0.137 |
0.234 |
0.063 |
0.427 |
18.95 |
RL4LMs |
11.26 |
0.169 |
0.144 |
0.198 |
0.071 |
0.455 |
18.83 |
OpenRL |
13.20(+17%) |
0.181(+10%) |
0.153(+12%) |
0.292(+25%) |
0.090(+43%) |
0.435(+1.9%) |
18.69 |
The table below shows that compared to OpenRL with Data-Parallel, OpenRL with DeepSpeed has a faster training speed:
FPS(Speed) |
Number of GPUs |
Memory Usage per GPU(MB) |
GPU Type |
Train Micro Batch Size per GPU |
|
|---|---|---|---|---|---|
DeepSpeed w/ GPT-2-small |
5.11(+30%) |
2 |
13537 |
RTX 3090 |
8 |
Data-Parallel w/ GPT-2-small |
3.94 |
2 |
7207 |
RTX 3090 |
8 |
DeepSpeed w/ OPT-1.3B |
7.09(+35%) |
4 |
35360 |
NVIDIA A100 |
8 |
Data-Parallel w/ OPT-1.3B |
5.25 |
4 |
15854 |
NVIDIA A100 |
8 |
Chat with Trained Agent
For a trained agent, users can easily engage in conversation through the agent.chat() function:
# chat.py
from openrl.runners.common import ChatAgent as Agent
def chat():
    agent = Agent.load("./ppo_agent", tokenizer="gpt2",)
    history = []
    print("Welcome to OpenRL!")
    while True:
        input_text = input("> User: ")
        if input_text == "quit":
            break
        elif input_text == "reset":
            history = []
            print("Welcome to OpenRL!")
            continue
        response = agent.chat(input_text, history)
        print(f"> OpenRL Agent: {response}")
        history.append(input_text)
        history.append(response)
if __name__ == "__main__":
    chat()
Execute python chat.py to start a conversation with the trained agent:
Tip
Users can find the sample code for this section in chat.py . In addition, we also provide an example of chatting with the ChatGLM-6B model in chat_6b.py.