Multi-Agent Training
MPE is a commonly used multi-agent training environment for testing the performance of various multi-agent reinforcement learning algorithms. Due to its simple installation, convenient customization, and easy visualization, MPE has become an ideal environment for beginners to learn about multi-agent reinforcement learning. In this tutorial, we will introduce how to use Multi-Agent PPO to train MPE agents. The following figure shows a simple environment (simple_spread) in MPE. The agents need to control three blue balls to reach three black dots marked as target points. On the left are the trained agents using OpenRL framework; on the right are random action agents.
Similar to training CartPole, we can create a train_ppo.py file and write our training code:
# train_ppo.py
from openrl.envs.common import make
from openrl.modules.common import PPONet as Net
from openrl.runners.common import PPOAgent as Agent
def train():
    # Create an MPE env with asynchronous mode where each agent runs independently.
    env = make(
        "simple_spread",
        env_num=100,
        asynchronous=True,
    )
    # Create neural network and use GPU for training.
    net = Net(env, device="cuda")
    agent = Agent(net) # Initialize trainer.
    # Start training process.
    agent.train(total_time_steps=5000000)
    # Save trained agents.
    agent.save("./ppo_agent/")
if __name__ == "__main__":
     train()
Compared with CartPole environment, we use asynchronous=True when creating MPE environment so that each agent can run independently and improve the efficiency of data sampling.
By default, asynchronous=False, which means that each environment will be executed in order.
In addition, to save the trained agents after training is completed, we use agent.save() function to save them in “./ppo_agent/” folder.
Tip
Users can find example code for this section in openrl/example .
Modify Training Parameters through Configuration Files
This training script still uses default parameters. We can easily modify hyperparameters by writing a configuration file.
Firstly, we modify train_ppo.py file and add code for reading configuration files. Then pass the read configuration to neural network Net():
# train_ppo.py
from openrl.envs.common import make
from openrl.modules.common import PPONet as Net
from openrl.runners.common import PPOAgent as Agent
from openrl.configs.config import create_config_parser
def train():
    # Add code for reading configuration files.
    cfg_parser = create_config_parser()
    cfg = cfg_parser.parse_args()
    # Create an MPE env with asynchronous mode where each agent runs independently.
    env = make(
        "simple_spread",
        env_num=100,
        asynchronous=True,
    )
    # Create neural network and pass hyperparameter configurations.
    net = Net(env, cfg=cfg, device="cuda")
    agent = Agent(net) # Initialize trainer.
    # Start training process.
    agent.train(total_time_steps=5000000)
    # Save trained agents.
    agent.save("./ppo_agent/")
if __name__ == "__main__":
     train()
Then we create a mpe_ppo.yaml file in the same directory as train_ppo.py to store hyperparameter configurations:
seed: 0
lr: 7e-4
critic_lr: 7e-4
episode_length: 25
use_recurrent_policy: true
use_joint_action_loss: true
use_valuenorm: true
use_adv_normalize: true
In this configuration file, we set the seed, learning rate, episode length, whether to use RNN and the JRPO algorithm, value normalization and advantage normalization.
Finally, we execute python train_ppo.py --config mpe_ppo.yaml in the terminal to start training.
Tip
In addition to modifying hyperparameters by reading configuration files, we can also modify them through command line. For example, users can directly execute:
python train_ppo.py --seed 1 --lr 5e-4
to modify seed and learning rate. When there are too many hyperparameters to be modified, it is recommended that you pass them through a configuration file.
Track Training Process with wandb
To use wandb, you need to specify information such as the name of the wandb team, experiment name, and path where the experimental data is saved. Of course, we can easily specify these through configuration files. Just add the following content to the configuration file:
# mpe_ppo.yaml
wandb_entity: openrl # This is used to specify the name of your own team.
experiment_name: ppo # This is used to specify the experiment name.
run_dir: ./exp_results/ # This is used to specify where experimental data will be saved.
log_interval: 10 # This specifies how often (in terms of episodes) wandb should upload data during training.
seed: 0 # Set seed for reproducible results across experiments.
lr: 7e-4 # Set learning rate for policy model.
critic_lr: 7e-4 # Set learning rate for critic model.
episode_length: 25 # Set length of each episode.
use_recurrent_policy: true # Whether recurrent policies should be used.
use_joint_action_loss : true # Whether joint action loss should be used.
use_valuenorm: true # Whether value normalization should be used.
use_adv_normalize: true # Whether advantage normalization should be used.
After writing the configuration file, we only need to set Agent(net, use_wandb=True) in train_ppo.py:
# train_ppo.py
from openrl.envs.common import make
from openrl.modules.common import PPONet as Net
from openrl.runners.common import PPOAgent as Agent
from openrl.configs.config import create_config_parser
def train():
    # Add code for reading configuration files.
    cfg_parser = create_config_parser()
    cfg = cfg_parser.parse_args()
    # Create MPE environment using asynchronous environment where each agent runs independently.
    env = make(
        "simple_spread",
        env_num=100,
        asynchronous=True,
    )
    # Create neural network with hyperparameter configurations.
    net = Net(env, cfg=cfg, device="cuda")
    # Use wandb.
    agent = Agent(net, use_wandb=True)
    # Start training.
    agent.train(total_time_steps=5000000)
    # Save trained agents.
    agent.save("./ppo_agent/")
if __name__ == "__main__":
    train()
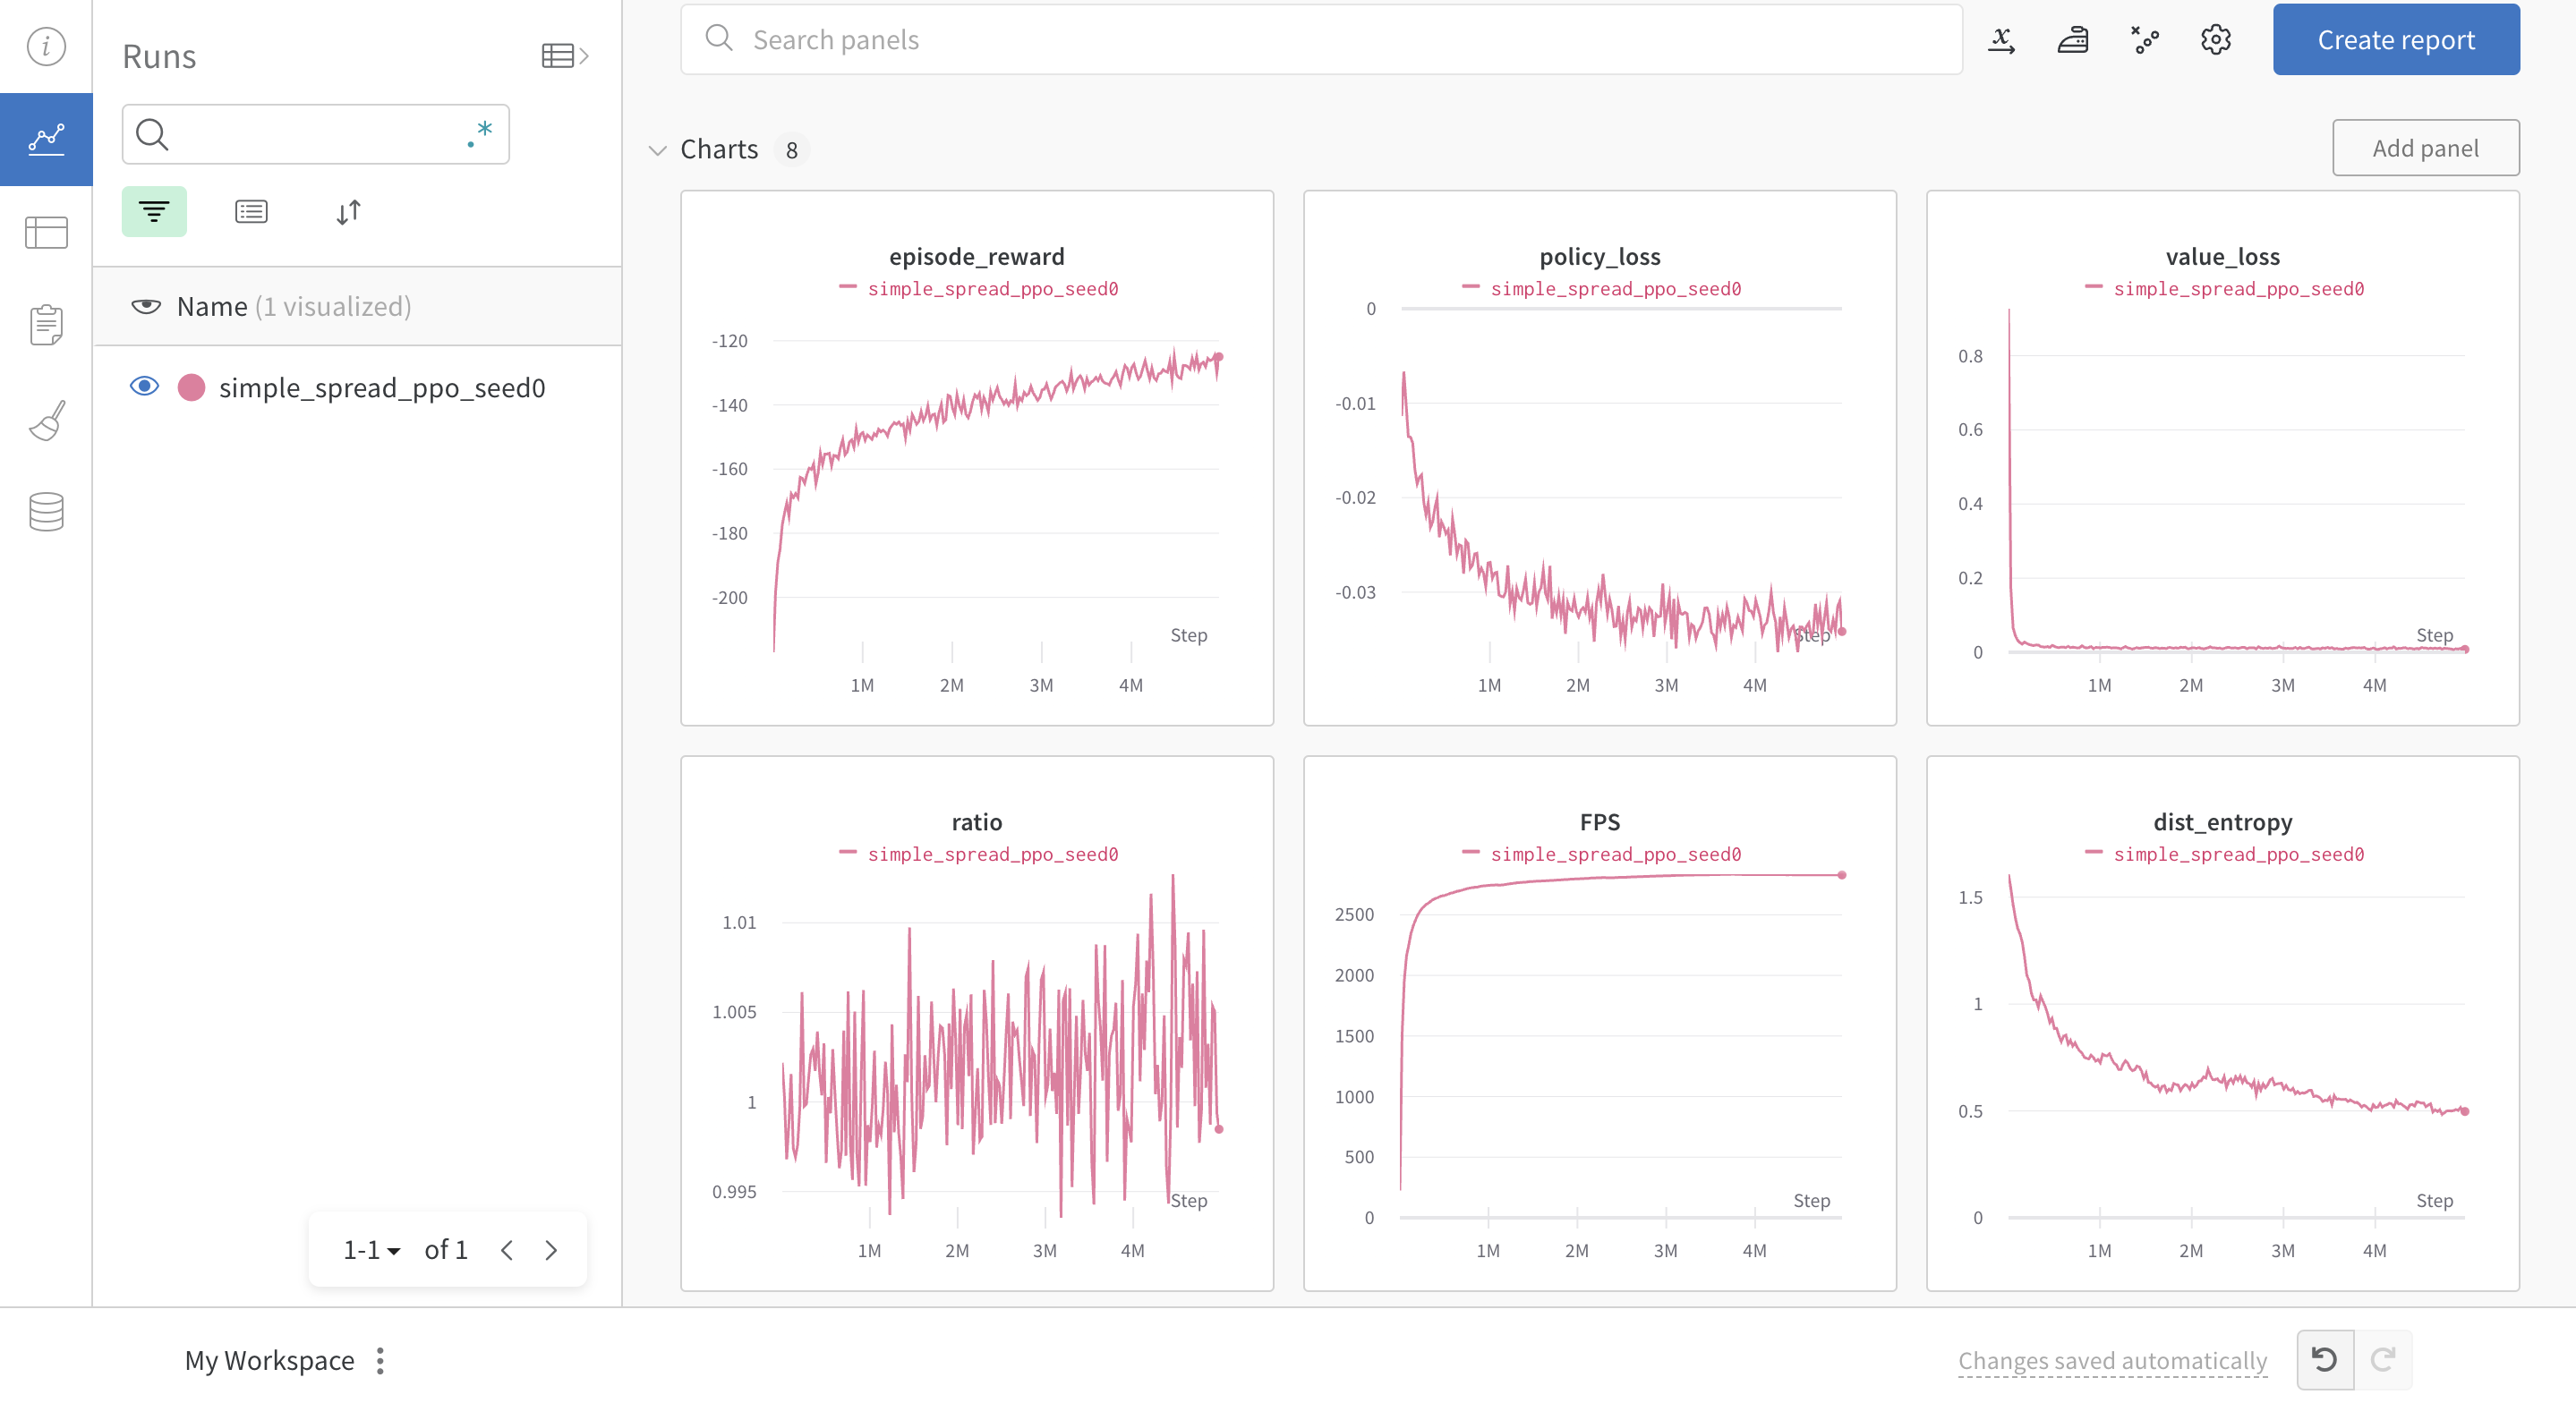
Execute python train_ppo.py --config mpe_ppo.yaml to start training. After a while, users can see the following training process on the wandb website:
Loading Trained Agent
After the intelligent agent is trained and saved, we can load the trained agent using agent.load() and test it.
Let’s create a new file named eval_ppo.py for testing the trained agent:
# test_ppo.py
from openrl.envs.common import make
from openrl.modules.common import PPONet as Net
from openrl.runners.common import PPOAgent as Agent
from openrl.envs.wrappers import GIFWrapper # used to generate gif
def evaluation():
    # Create MPE environment.
    env = make("simple_spread", env_num=4)
    # Use GIFWrapper to generate gifs.
    env = GIFWrapper(env, "test_simple_spread.gif")
    agent = Agent(Net(env))  # Create an intelligent agent.
    # Load the trained model.
    agent.load('./ppo_agent/')
    # Begin to test.
    obs, _ = env.reset()
    while True:
        action, _ = agent.act(obs)
        obs, r, done, info = env.step(action)
        if done.any():
            break
    env.close()
if __name__ == "__main__":
    evaluation()
Then execute python eval_ppo.py in the terminal to start testing. After testing is completed,
we can find the test_simple_spread.gif file in the current directory for observing how well our intelligent agents perform: